Post
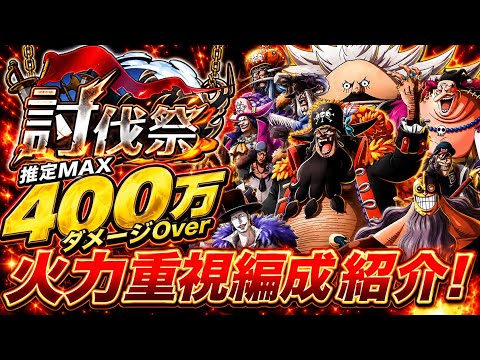
One Piece Treasure Cruise: Dealing over 4 million damage with a high-power formation for the Raid BattleThis video introduces a high-damage team setup for the "Treasure Cruise" event in One Piece, capable of dealing over 4 million damage. We'll cover specialized strategies for the Luffy and Nasu boss battles, along with detailed explanations on how to utilize each character.
1. ✨ Introduction to High-Damage Team Setup & Target Damage for the Conquest Event
· This video introduces a high-damage team setup for the Conquest event in One Piece Treasure Cruise, aiming for over 4 million damage.
· Unlike setups for clearing missions, this focuses purely on dealing damage, and with sufficient character development, you can easily exceed 4 million damage.
· The current score is around 3.6 million, but higher scores are achievable depending on your character's growth.
· Unlike setups for clearing missions, this focuses purely on dealing damage, and with sufficient character development, you can easily exceed 4 million damage.
· The current score is around 3.6 million, but higher scores are achievable depending on your character's growth.
00:01 - 00:49
1. ✨ Introduction to High-Damage Team Setup & Target Damage for the Conquest Event
· This video introduces a high-damage team setup for the Conquest event in One Piece Treasure Cruise, aiming for over 4 million damage.
· Unlike setups for clearing missions, this focuses purely on dealing damage, and with sufficient character development, you can easily exceed 4 million damage.
· The current score is around 3.6 million, but higher scores are achievable depending on your character's growth.
· Unlike setups for clearing missions, this focuses purely on dealing damage, and with sufficient character development, you can easily exceed 4 million damage.
· The current score is around 3.6 million, but higher scores are achievable depending on your character's growth.
00:50 - 01:43
2. 🎯 Analysis of Boss Characteristics and Damage Rules
· Luffy Boss: Increased damage taken by Quick and Brawler types, 30% reduced damage taken by Tech types. Possesses Tech type debuffs.
· Nasu Boss: Increased damage taken by Quick and GU types, 30% reduced damage taken by Tech types. Similar to the Luffy boss, using Tech types is not recommended.
· Saturn Boss: Increased damage taken by Free and Yashin types, 30% reduced damage taken by Hyakushiki.
· All Characters Common: 10% increased damage taken by Blackbeard Pirates and Paramecia types.
01:54 - 03:06
3. ⚔️ Recommended Team Setup for Luffy & Nasu Boss Battles
· The Luffy and Nasu boss battles can be tackled with the same team setup.
· Key changes and core characters:
- Hancock: A core high-damage dealer for this Conquest event, with Niji's 2nd potential unlocked.
- Poisonous Type: A limited-time character with outstanding performance.
- 12th Anniversary Blackbeard: Possesses powerful damage-dealing capabilities.
- 12th Anniversary Gacha Kuma: Serves a damage-boosting role.
03:09 - 04:28
4. ⚡️ Practical Play: Damage Dealing in the Luffy Boss Battle
· Timing is crucial in the Conquest event, especially the seal effect.
· While the seal effect is mostly ineffective against the Luffy boss, the special skill seal is still valid.
· You can see significant damage being dealt when Hancock uses her super special skill.
· Blackbeard Pirate characters deal an additional 1.5x armor-piercing damage to enemies with debuffs applied, contributing to damage output.
04:38 - 05:38
5. 📈 Utilizing Blackbeard Pirates and Factors for Damage Increase
· Hancock's super special skill boasts high damage, and its effectiveness can be further enhanced by character level and potential.
· Kuma's ability to deal an additional 1.5x armor-piercing damage to enemies with special skill seal and action seal applied greatly contributes to damage increase.
· You can observe a significant increase in damage as the level of Blackbeard characters increases.
· Kuma's ability to deal an additional 1.5x armor-piercing damage to enemies with special skill seal and action seal applied greatly contributes to damage increase.
· You can observe a significant increase in damage as the level of Blackbeard characters increases.
05:52 - 06:35
6. 📉 Luffy Boss Battle Score and Team Efficiency Analysis
· If the special skill seal is not immediately applied to Luffy, there's a significant difference in damage.
· Considering the team's rotation speed and knockback effects, it's quite easy to rack up damage.
· The Nasu boss battle can also be tackled with the same team setup.
· Considering the team's rotation speed and knockback effects, it's quite easy to rack up damage.
· The Nasu boss battle can also be tackled with the same team setup.
06:40 - 07:53
7. 🤔 Difficulties in Developing Luffy Characters and Team Setup
· Questions arise regarding the reasons for the lack of development in Luffy characters.
· It's mentioned that during the 12th anniversary, it was difficult to obtain Luffy characters through the gacha when trying to develop them.
· In situations where the special skill seal is not applied, Hancock's 50% special skill seal effect can become meaningless.
· It's mentioned that during the 12th anniversary, it was difficult to obtain Luffy characters through the gacha when trying to develop them.
· In situations where the special skill seal is not applied, Hancock's 50% special skill seal effect can become meaningless.
09:42 - 10:20
8. 🛡️ Defense Reduction Strategy for Peter and Saturn Battles
· If Peter is put into a paralysis state, Defense Down Level 5 is applied up to 2 times, increasing to a total of Level 10. This must be utilized for damage dealing.
· Taunt also provides a 1-turn Defense Down Level 5 effect, which is essential for dealing damage.
· However, if seals are applied to the opponent's characters, this setup can be disadvantageous for dealing damage.
· Taunt also provides a 1-turn Defense Down Level 5 effect, which is essential for dealing damage.
· However, if seals are applied to the opponent's characters, this setup can be disadvantageous for dealing damage.
10:21 - 11:57
9. 🚫 Blackbeard Pirates Setup: Stability vs. Damage
· If seals are effective against the opponent's characters, the Blackbeard Pirates setup can ensure a stable victory, but dealing damage might be difficult.
· The Blackbeard Pirates have a 20-second seal effect, restricting the opponent's actions.
· It's effective to apply stat downs to Peter and then seal him.
· Be cautious with Saturn, as using skills can lead to forced retreat.
· The Blackbeard Pirates have a 20-second seal effect, restricting the opponent's actions.
· It's effective to apply stat downs to Peter and then seal him.
· Be cautious with Saturn, as using skills can lead to forced retreat.
12:15 - 13:05
10. 📈 Securing Stable Victory and Limitations of Damage Dealing
· This setup provides absolute stability, ensuring you won't lose, but the amount of damage dealt might be somewhat lacking.
· Dealing damage is difficult due to the opponent's high defense.
· In most cases, the opponent is unable to do anything before the mission is completed.
· Dealing damage is difficult due to the opponent's high defense.
· In most cases, the opponent is unable to do anything before the mission is completed.
13:08 - 14:22
11. 📉 Disappointment with Blackbeard Pirates Setup Damage and Future Plans
· It's disappointing that the damage from the Blackbeard Pirates setup is lower than expected.
· Since Blackbeard characters are the main source of damage, securing as many attack opportunities as possible is crucial.
· In the future, we plan to strengthen characters through gacha and create videos for tackling 5-star bosses with different team setups.
· Since Blackbeard characters are the main source of damage, securing as many attack opportunities as possible is crucial.
· In the future, we plan to strengthen characters through gacha and create videos for tackling 5-star bosses with different team setups.
14:23 - 15:16
12. 🌟 Final Team Setup Summary and Notes
· For the Luffy and Nasu boss battles, we recommend using the team setup introduced in this video.
· The amount of damage may vary depending on your character's development level.
· All characters have Gold potential abilities assigned, 3 characters have 2nd potential abilities, and Kuma has Silver potential abilities.
· We hope this video helps you in conquering the Conquest event.
· The amount of damage may vary depending on your character's development level.
· All characters have Gold potential abilities assigned, 3 characters have 2nd potential abilities, and Kuma has Silver potential abilities.
· We hope this video helps you in conquering the Conquest event.