Post
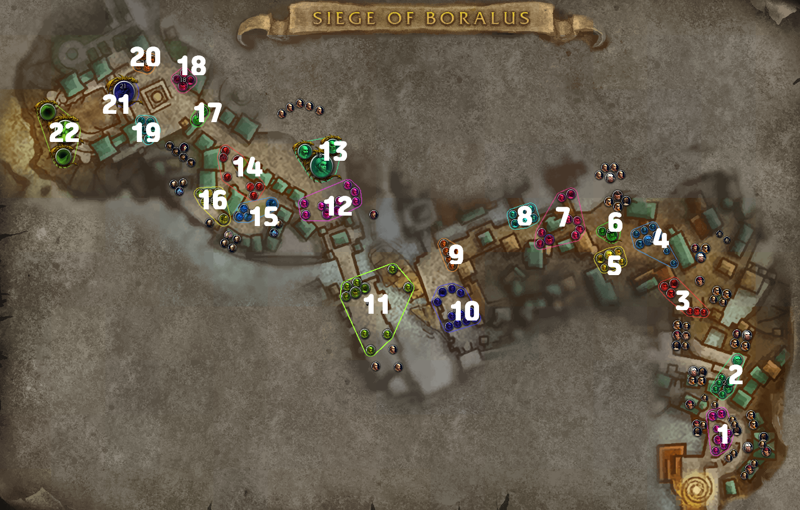
Boralus explained with MDT + text
Somehow I'm even using Boralus, let's go
Preparation
1 Invisibility Potion OR Rogue (for Invisibility Potion skip)
Warlock [Affliction NOT preferred] (for last boss dispel, Boralus specialist) if not, take a Priest for Mass Dispel while crying
Poison Dispel, Curse Dispel, Disease Dispel classes are good to have, but not essential (for tank support)
Tanks are easier if they are Dwarves or Dark Iron Dwarves
It's more comfortable to only take 1 melee DPS. If you have to, max 2, any more and the last boss will be painful
If your race is naturally short, Transmog potions OR height-increasing toys are essential
Bloodlust Timing - after the 2nd boss
1st Major Mob
Bonescribed Enforcer
Crushing Shout- AoE damage that makes healers cry.Use survivals well
If you get hit by Crushing Shout during castYou get silenced for 1.5 seconds, so interrupt casting
Frontal - aimed towards the tank. The floor color is similar so it's hard to see, so tanks need to focus and dodge well. If you get hit, you get knocked back,
And if you're unlucky, you fall into the sea and become shark food
Black Tar Bomber
Focus fire one after marking a skullRecommended
The main reason people die at the 1st boss
Firebomb- Constantly throws firebombs at random targets every 2 seconds or so, and it's just insane damage. + AoE damage around the target (I'm not sure exactly how many meters)Use CC to give the healer time to breathe
Especially, you need to use CC before the Enforcer's Shout timing to buy time for healing
Burning Tar - Creates a burning ground that starts as a small circle and gradually gets bigger. The initial floor indicator is small, so watch carefully and avoid it
Bonescribed Butcher
Tanks based on Haste (DK, DH, Paladin) be carefulTo do
Tooth Grinder - If hitHaste reduced by 15% for 10 secondsIf you get hit, tanks that tank based on haste like Death Strike need to rotate survivals to survive. You can't even kite it
The Bomber is on ranged, and the Enforcer's frontal is towards the tank, so it's hard to turn the head, and the path to the DPS will be covered in fire. Grit your teeth and endure
2nd
Only the Bomber is gone from the 1st boss
Two more are added
Iron Tide Wavecaller
Brine Bolt-Must interruptIf the key level goes up, one shot one kill
Watershell - 90% damage reduction. When the damage reduction ends, AoE stun. If the team hasShaman, Mage, Priest, Warlock (Affliction NOT preferred)Just let them use it
If castCounterspell, Spellsteal, Mass Dispel, Spell Lock (Imp) to deal with itPossible. If the team comp doesn't have those classes, interrupt it
DH can also do it, but I know they don't take it because of points (talk about it beforehand to prevent accidents)
Iron Tide Pillager
Furious Squall - Uses a not-so-threatening AoE. Dodge it well
Iron Hook- Pulls all players and deals damage. If thisOverlaps with the Enforcer's Shout
UseSurvival. DPS who didn't use it get torn to shreds.
Use Bloodlust to burst down one of them
If you attach with a little gap, you can prevent them from using it at the same time
3rd
Since a roamer goes back and forth at the end of the 3rd boss, pull the first 3 mobs and attach them to the last 3 mobs, then stick to the corner
If there's a Mage or Warlock on the team, never aggro the roamer (reason will be explained later)
Wavecaller - Interrupt well
Bomber - Focus fire
Butcher - Haste tanks be careful
Stormsong Crusher
Steel Ambush - Teleports behind a random target and hits them. Just a normal heal check
Singing Steel-Tank caution skill.LargePhysical damage followed by a stacking bleed DoTIs left. There will be two of them, so it will be doubled.
This bleed damage is harder to endure than you think, so if your race is Dwarf or Dark Iron Dwarf, use your racial to remove it once.
The internal cooldown is 14 seconds or 18 seconds? Anyway, there's a limit to enduring it with survivals.
If you have an Evoker in the party, ask the Augmentation Evoker to use Eruption on you
If the 6 mobs attached to the left wall at the beginning of the 3rd boss are aggroed, it's also a way to attach the 6 mobs to the 3 mobs at the entrance.
Instead, there's an Enforcer added, so DPS need to be careful with their survivals.
If aggroed, use one more Invisibility Potion to pass the 3rd pull and move to the 4th pull.
(The large roamer is invisible, so Invisibility Potion OR Rogue skip when the roamer passes)
Reason why you shouldn't aggro the roamer between 3-4
I don't know what bug it is, butIf the roamer is aggroed, the game thinks the fight with the 1st boss has startedBecomes
The 1st boss doesn't actually come, but it remains as a fight that's constantly going on, so
When fighting the 4th and 5th bosses, unintended automatic skills hit the boss
(Confirmed: Frost Mage Ice Lance/ Arcane Mage Summon/ Warlock Demon automatic attack flies. I think Paladin automatic hammer and Balance Druid Starfall will also go in)
4~5th
Pillager - Deal with Iron Hook pull well
Wavecaller - Interrupt arrow/ Spellsteal Watershell etc.
Bomber - Focus fire
Crusher - Tank deal with Singing Steel well
6th
1st boss Redhook
Redhook periodically targets one target and slowly follows them.
At this time, Redhook's auto attack range is much longer than the visible target box, so avoid getting hit by auto attacks and dying by moving away in advance
Main Skills
Summon 3 bombs on the battlefield- Both enemies and allies can step on them, and if the boss steps on them, it takes a lot of damage and increases damage taken by 50% for 10 seconds. Burst damage at this time
Pull all party members and deal AoE damage around them-> You can easily avoid AoE damage by moving after being pulled.
Summon adds- The tank should take aggro of the adds. There are ranged adds and melee adds, and the melee adds cast a narrow and long frontal, so make sure the head direction doesn't face the bomb.
In the past, I used to get a lot of unfairness because the melee add's frontal overlapped when I was pulled, but now, when I'm pulled, I'm immune to the melee add's frontal for a while, so if you don't want to lose DPS, the tank can follow the boss and park the melee add so that it can be hit
The main strategy is to guide the targeted person so that Redhook can step on the bomb, and burst damage when he steps on it
When avoiding AoE damage after being pulled, everyone except the tank should go behind the bomb in advance
Guide them to step on the bomb right away
The tank should watch the bombs and the summoned adds on the battlefield
The tank must take aggro of the adds as soon as they come out.
The bomb has a timer after it's summoned, and if the timer runs out, the party takes instant-kill AoE damage.
The tank must deal with the bomb before the time runs out, either by stepping on it or by guiding the small adds to step on it.
7th~8th
Ashvane Commander
Azerite Grenade - Runs to a random target and deals damage to the target and those around it. The target should move away from the group
Shout of Fortification - 75% damage reduction buff for 8 seconds to nearby mobs. Since one person can interrupt with a 14 second interrupt cooldown, one person is in charge.
Iron Tide Cursedblade
Cursed something - Arcane damage + stacking 15% increased damage taken curse sword
Dispel curse well
Iron Tide Gunpowder Sailor
Normal ranged mob
The rest is a complete set of the ones that come out in front
Singing Blade - Deal with bleed debuff well
Wavecaller - Interrupt arrow/ Spellsteal Watershell etc.
Way to 9th
Long corridor format
The mobs at the end periodically shoot forward until the fight starts. (If you just get hit, you die in about 2 seconds)
To avoid this shot, take cover behind nearby boxes, pillars, etc. and move forward.
In fact, it's easy if the tank uses a movement skill and starts the fight before shooting.
(Warrior - Heroic Leap + Charge, DH - Jump twice, Paladin - Divine Steed + Hammer Throw, etc.)
However, even if the fight starts, there are cases where the shot is cast towards the corridor once in a while, so the latecomers should wait safely once and then move
9th+10th Chain Pull
Lookout
Annoying mob that keeps running away
It's easier to chain CC to prevent it from moving or to herd it into a corner.
Spotted Cannon - Periodically summons a floor where bombs will drop on one person after a while.
This floor also deals damage to mobs other than the Lookout. But the damage is weaker than in Battle for Azeroth, so I don't think you need to try so hard to hit it
When the ranged DPS is cleared up to a certain extent, attach the 4 mobs in front of the 10th boss
Also, when it's cleared up to a certain extent, catch the Cursedblade group behind.
Especially when entering the fight with 7 Cursedblades, the tank must enter with two big survivals
Otherwise, you'll get hit by 7 curses at once and get torn apart
11th
Similarly, calculate whether you can withstand the Cursedblade pull and attach it little by little. Since they have low health anyway, there's no reason to attach them all at once
Designate a dedicated marker for the Commander
Wavecaller Interrupt arrow/ Watershell deal
Think carefully about the Cursedblade tank's survival rotation
12.
Added mob
Cannon Deckhand
Casts a straight frontal towards the tank - The tank should guide the frontal well
Sword Deckhand
Sword that gives the tank a stacking 5% increased damage taken debuff for 10 seconds
Be careful with survivals because you're catching it with the Cursedblade
Commander dedicated marker
Lookout herding
13.
Captain Raoul
1 Phase - Intermission - 1 Phase - Intermission - 1 Phase pattern
1 Phase
Tank Important Skill
Belly Shot - WoW's fixed mobs use a one-shot kill skill if there are no enemies around them
Raoul's one-shot kill skill is Belly Shot. It deals terrible damage + DoT damage to a random target, so you can't actually save them
The tank should never move away from Raoul
Originally, he kept jumping around like a madman unless he was slowed or immobilized, but this seems to have been patched out
Deck Clearing (Frontal) - Tank can guide it. If possible, guide it to the side where there is no group
DPS, Healer Important Skill
Burning Grenade - A chain skill used on the target + up to 3 people
It deals a lot of damage + a lot of DoT damage for 5 seconds, so DPS who get hit should use their survivals well to survive
Healers cry and fill them up
Spotted Cannon
Same skill as the Lookout
A tip is to avoid the floor with 2 times - move - 2 times - move with little movement
Raoul enters the intermission when his health is 66% and 33%
So it's better to use Bloodlust when it comes down from 66%
(Cooldowns from 100~66%, Bloodlust from 66%~33%)
Intermission
The captain runs to the ship and continues to bombard the battlefield (avoid the floor)
3 adds come out, and if you shoot the cannon that comes out after catching the cannon add in the direction of the ship, the boss pops up again
(You don't have to aim at the center, just shoot anywhere towards the ship and the boss will come down)
Repeat 1 phase when you come down
Way to 14th
Same pattern as avoiding corridor shots earlier.
When bullets pour down, use fountain-like cover to avoid them and go to the end of the road to release the shot
Tanks with good movement skills such as Warriors and DHs can be hit once or twice and break through
14th-15th
Close-range - Disgusting section
It's a little easier if the tank pulls the back adds from the 14th to a wide area with a ranged skill
Sewer Rat Destroyer (Giant)
Crushing Slam - Painful AoE damage comes in. DPS and healers use survivals if their health is low
Howl of Terror - A purple floor appears near the adds and fears the surrounding area for 4 seconds. There's no damage, so if you have something like Tremor Totem, you can just get hit and deal damage.
Pirate Crewman
Banana Frenzy - Close-range disgusting mob. It spins around and scatters bananas that stun for 2 seconds if stepped on. Cut it off with CC when it spins.
The bananas are small and hard to see. Avoid the bananas on the floor as best you can
Sewer Rat Marauder
Nasty Vomit - Interrupt
Storm Caller
Water Bolt - Interrupt
Suffocating Water - Interrupt if it's targeting the healer
If there are not enough interrupts, Spellsteal the target
16th
Tank Caution Section
14~15th mobs + Assassin are added
Sewer Rat Assassin
Festering Wound - Strong damage + DoT +25% reduced healing receivedMust interrupt
If there's a disease dispel class, support with disease dispel. If not, self-dispel with Dwarf racial, Warrior Spell Reflection immunity, etc.
Way to 17th
Go up the stairs and use Invisibility or Rogue skip
If there's no prior agreement, always skip the group of 4 gunners
Otherwise, you can watch your party members go to meet their ancestors in real time (you can just catch them if the key level is low)
17th
The guy on the horse is invisible, so if the DPS and healers skipped Invisibility, wait until the tank pulls
Manage your health or use survivals well before getting hit by Azerite Grenade Chain Pull
1 dedicated interrupt for the Commander
18th ~19th
Tank Caution Section 2
Commander, Wavecaller + useless trash mobs + Invader are added
InvaderGives the tankStinging Poison stackGives
It stacks up to 5 times and is very painful.
Get support if you have poison dispel
If not, survival rotation + Dwarf racial + Warrior Spell Reflection immunity
Especially for the 19th boss, there are 2 poison dealers, so you have to be ready to run away
20th
If an accident happens and the percentage is full, you don't have to catch it. Party members should be careful of aggro before the boss
Sniper
Reason for skipping the 17th road
Continuously attacks random targets from a distance. The damage is insignificant
But what's even crazier is the occasional castSawblade GrenadeIf these two hit one person at the same time, that one person is deleted
If Sawblade Grenade is castInterrupt unconditionallyTo adjust so that they hit separately as much as possible, or to prevent them from using it
21st
3rd Boss
Main Pattern
Creates a floor under the feet of everyone except the tank (strong AoE damage when it's created) - Tank Frontal - Creates a floor under the feet of everyone except the tank - Avoid the wave twice
Cycle Repeat
When a floor is created under your feet, DPS should use one survival each
The tank should be careful not to guide the frontal to the group by turning the head
Waves come sequentially from 2 of the 4 sides. You can avoid the waves with the fountain pillar in the center, so move accordingly.
At this time, there is shallow water around the fountain pillar, and characters of dwarf origin will swim there.
Therefore, it is recommended to use a height-increasing transmog potion or toy before the 3rd boss, or to transmog to a tall character with an Atomic Recalibrator before starting the dungeon.
There is one more thing the tank needs to be aware of: the tank's frontal overlaps with the 2nd wave that comes in the 3rd or 4th cycle (I'm not sure exactly whether it's the 3rd or 4th cycle, but what's certain is that it always overlaps with the 2nd wave)
The tank must pull out the frontal and run away to a safe zone with a movement skill so that it doesn't hit the group.
This boss is busy for the healer, so it's convenient to promise external cooldown distribution in advance.
EX 1st cycle 1,2 floor Bloodlust, so raw heal. 2nd cycle 1 floor survival/2 floor external cooldown 1, etc.
22nd
4th Boss
Octopus Head
The basic strategy is to destroy 2 tentacles - the NPC caught in Binding Terror repairs the cannon in the center of the battlefield - any player rides that cannon and shoots at the octopus (press 1) - move to the platform a total of 3 times
There is Terror of Destruction and Binding Terror
Terror of Destruction periodically deals AoE damage, so focus fire on Terror of Destruction first to prevent the healer's mana from running out.
The boss periodically deals floor damage on the battlefield - avoid it well
Rotting Water
The reason why Warlocks (Affliction NOT preferred) are popular in Boralus
Periodically applies a debuff to 2 targets, and this debuff has insane tick damage.
In the key level I went to, one person disappeared because 2 ticks were new lol
WarlockCanSummon Imps to Spell LockTo support the removal of the debuff. If not, Priests can support with Mass Dispel once, but the efficiency is very low.
However, Spell Lock has a cooldown even if it fails, so if the Warlock removes it first and the healer promises to remove the remaining debuff, accidents can be prevented
Affliction Warlock's damage drops if they summon Imps, so there's no reason to bring Affliction Warlock
Because of this debuff, the healer goes back and forth to hell, so the tank should look at the Rotting Water once when moving to the platform and move to fight to make it easier.
(If you don't hit the tentacles summoned on the next platform when moving to the platform, you won't deal AoE damage to the tentacles) Especially for healers, it's hard to heal while moving, so it's very, very, very helpful to remove Rotting Water and move to the platform.
The tank should look at the time table and adjust so that if it takes a long time for Rotting Water to come when moving to the platform, just move, and if it's coming soon, remove it and move
You'll see two water-shaped projectiles flying from the central octopus for Rotting Water, and if you see this and the projectile is flying towards you, the Warrior can Spell Reflect it, sometimes it works and sometimes it doesn't. Anyway, it's good for each other if Spell Reflect works.
DKs can avoid it by using Anti-Magic Shell when they see it flying and it's targeting them.
I know that the octopus in Battle for Azeroth is also a fixed mob, so if there are no melee targets around the Terror tentacle, AoE damage comes in
(I haven't checked in The War Within)
Also, melee DPS is limited because of this debuff
When dispelled, it blows away nearby allies far away.
If you fall into the sea, you'll be caught by tentacles and killed in a few seconds, so if there are a lot of melee DPS, you'll see hell.
If you have to take a lot of melee DPS, promise in advance to split Terror and Binding in half.
The healer will heal on their own..
It is recommended to use Bloodlust on the third platform.
Boralus Mythic+ Fighting
Boralus is a dungeon that is not often visited, so if there are any mistakes, please let me know in the comments.
World of Warcraft Inven Expansion Pack Tips and Know-howBibimmyeon 2 bowls
2024-10-10
Your gaming prime time starts now!Sign-in to Vortex Gaming, receive gaming news and engaging contents!