Post
One-Point Mythic+ Guide 2: King's Rest!!
Mythic+ Dungeon Guide Collection for Season 2 of The War Within
I'm a Havoc DH, Vengeance DH, Prot Pally, and Enhancement Shaman player
Please understand that this guide may lack perspective from ranged DPS and healers
The routes are based on what I've personally used
Please consider the mob guide as a means of explanation
Entrance ~ 1st Boss
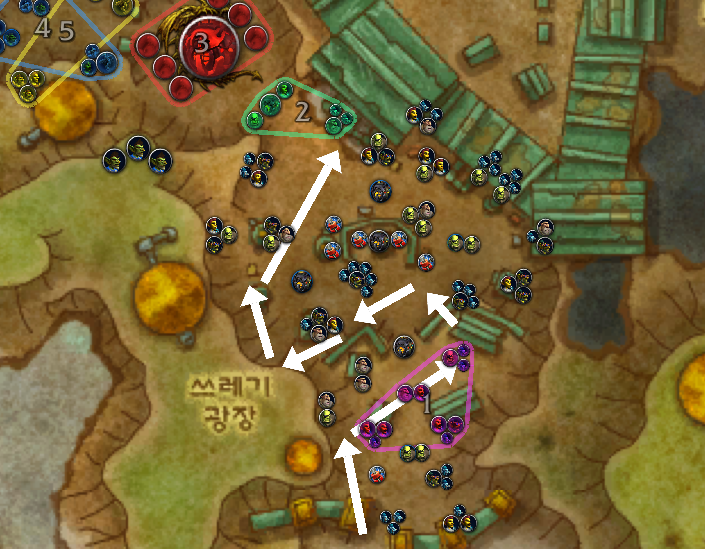
I think the time and difficulty of this section varies greatly depending on the tank's skill.
You can proceed by killing everything from the entrance, but surprisingly, you can skip many places without using WAs or non-combat CC.
It seems that a pathing route has been established to minimize pulling the "Mechanized Peacekeepers" that use powerful tank busters and create large ground effects that cause disorientation.
1.
Move along the leftmost wall from the entrance. After sending the link to the 2 roaming assassins,
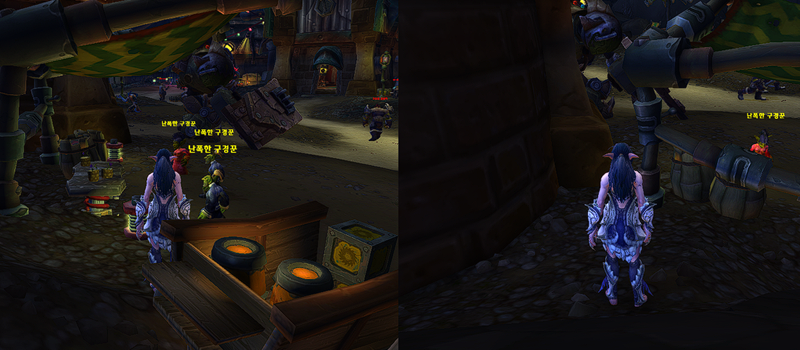
If the assassin has completely passed, it is safe to pass under this tent.
You can pass through that gap like in the picture on the right. However, it is difficult to ride a mount here.
It is recommended to dismount and pull while taking them because it is a section where the tank often pulls accidentally.
Park at the location where the last group is linked, and finish by using Bloodlust.
Casts "Wrench Toss" dealing physical damage to a random target: Off-Shift Laborer
Casts "Iced Beverage" dealing magic (frost) damage to the target and stunning them upon completion: Revitalizing Food Vendor
Uses "Steam Inhalation" granting increased attack and movement speed to themselves, and uses "Uppercut" dealing physical damage and launching the target and its surroundings into the air: Goofy Thug
The group is linked with a Hired Assassin who applies poison to their weapon with "Venomous Blades", and uses "Blade Flurry" dealing area physical damage.
->"Iced Beverage" can be interrupted and dispelled.
->"Steam Inhalation"can be enrage dispelled.
->"Venomous Blades" can be interrupted, and "Blade Flurry" can be interrupted with CC
->There are neutral monsters called Rowdy Bystanders nearby. They don't have any skills to cast, so just kill them.
=>Bloodlustuse, be careful not to pull accidentally when the tank pulls,Iced Beverageinterrupt,Venomous Bladesinterrupt if possible (reduces tank burden),Uppercutpay attention to the direction you're knocked back (be careful of adds). Focus fire on the Hired Assassin,Blade Flurrymust be interrupted with CC (high priority)
-Skip Section
After killing the first group, you can jump over the fence behind by stepping on the boxes.
The Mechanized Peacekeepers that are roaming are fast, so be careful and move to the 2nd group.
2.
Goofy Thug, Revitalizing Food Vendor, Off-Shift Laborer, Hired Assassin
The group is linked with a Mechanized Peacekeeper who deals strong magic (nature) damage and applies a snare to the tank, and casts "Charged Barrier" dealing AoE damage to the entire party, and lays down ground effects that deal magic (nature) damage and cause disorientation when stepped on: "Tear Gas".
->Since the range of "Tear Gas" is wide and the duration is long, the tank should use a wide space up to the boss room.
=>Blade FlurryCC,Iced Beverage,Venomous Bladesinterrupt,Uppercutpay attention to direction,Tear Gaswatch out for the ground
3.
1st boss is the Coin-Operated Crowd Pummeler.
Deals magic (nature) damage, applies a nature damage DoT, and knocks back with "Charge Pulse"
Shoots a frontal cone dealing nature damage in a random direction, stunning those hit with "Impact Claws"
Pulls coins and players within 15 yards with "Coin Magnet"
Casts "Soccer Bomb Launcher" which scatters soccer balls that explode if not dealt with.
->The boss usually usesCharge Pulse - Coin Scatter - Soccer Bomb Launcher/Impact Claws - Coin Magnetin that order.
->If the boss absorbs a pile of gold withCoin Magnet, its attack power increases by 15% per pile absorbed. Therefore, the tank mustkeep the boss away from the gold piles.
->After scattering the gold piles, it usesSoccer Bomb Launcher, and if you face the boss and interact with the soccer ball, you can send it towards the boss. Use this tohit the boss with all the soccer balls.
->When you hit the boss with a soccer ball,the damage the boss takes is increased by 15%, stacking up to 6 times. If the boss's attack power was increased by absorbing gold piles, that buff is also removed.
->If the soccer balls are not dealt with in time, they explodedealing damage to the party.
->Impact Clawscan just be dodged.
->Coin Magnetdoes no damage. Melee DPS don't need to stop attacking.
2nd Boss Trash ~ 3rd Boss
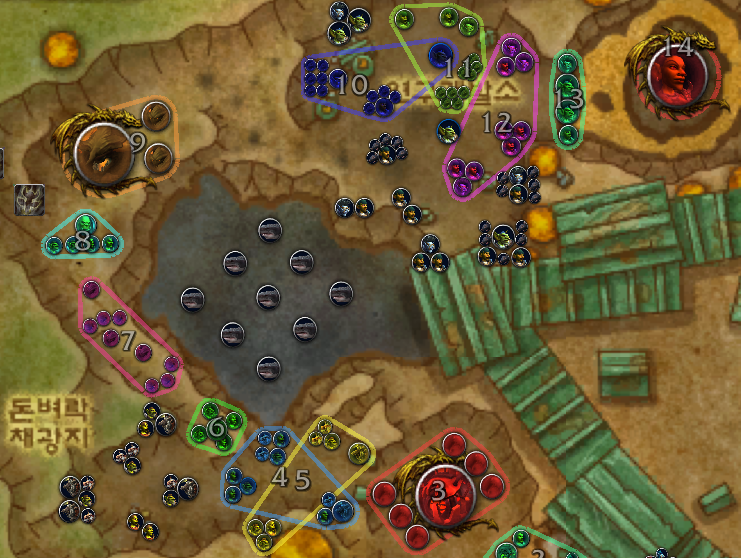
This section has groups that deal a lot of damage and quickly create large ground effects.
Since the instance resurrection point after defeating the 1st boss is the 1st boss's room, you can get up and run back immediately if you die.
4, 5, 6.
Mine Rats that cast "Rock Throw" dealing physical damage to the target
Uncontrolled Demolitionists that use "Mining Charge" dealing area magic (fire) damage to the target and surrounding area, "Final Blast" exploding into an 8-yard radius AoE when low on health, and "Bomb Pack" which scatters small ground effects upon death
Investment Development Company Earthshapers that cast "Ground Shock" dealing instant cast AoE damage, and "Stone Javelin" dealing nature damage + DoT + healing reduction to the target
Azerite Extractor groups that apply physical damage + bleed to the tank with "Impale", and use "Rapid Extraction" dealing party-wide AoE damage and quickly creating large ground effects in succession.
->Adjust the pulls so that there are no more than two Azerite Extractors per group.
->"Rapid Extraction", "Final Blast", "Bomb Pack" all have large ranges, so you need to park in a way that allows for a wide space.
=>Stone Javelinhighest priority interrupt, support with AoE CC as much as possible, avoid ground effects as much as possible and be careful of adds
7.
Shalebiters that cast "Shale Spit" dealing acid damage to the target
Rage Stone groups that cast "Earthen Bulwark" shielding themselves and preventing spell interrupts, and "Seismic Fury" dealing party-wide AoE damage and applying a slow.
->"Earthen Bulwark" can be dispelled.
=>Earthen Bulwarkinterrupt,Seismic Furyinterrupt or delay with CC
8.
Uncontrolled Demolitionist, Investment Development Company Earthshaper,
Foreman Askaari groups that use "Overtime!" increasing the haste of nearby allies by 30%, "Massive Impact" dealing party-wide magic (nature) damage, and "Brutal Charge" charging at the target, dealing physical damage, and applying a slow.
->Askaari constantly applies strong melee attacks and a bleed debuff to the tank. This debuff stacks and the duration accumulates.
->Since the path is narrow, ranged DPS should keep their distance, being mindful of the Demolitionist's ground effects.
=>Stone Javelinhighest priority interrupt, watch out for ground effects, the tank should move away from Askaari at the timing of the charge to remove the debuff
9.
2nd boss is Azshirq.
Calls adds that fixate on a random target with "Earthbreaker Summoning"
Empowers adds with "Azerite Infusion"
Deals area magic (nature) damage and applies a slow with "Resonant Tremor"
Deals physical damage in a frontal cone, launching those hit into the air with "Tectonic Shatter".
->The target of the 2nd boss's add (Earthbreaker)'s fixate (Furious Gaze) shouldkeep movingto avoid being attacked. Getting hit by the add'sSerrated Bladeswill inflict a stacking DoT.
->Resonant Tremorleaves behind ground effects that last for quite a while, so the tank shouldtry to stack the ground effects.
->Also,Resonant Tremoris also cast by the adds if there are any remaining when it's cast by the boss, so it's a boss where you end up killing the adds while killing the boss.->The add targeted byAzerite Infusion
hasincreased attack power and deals continuous AoE damage, but takes increased damage. Therefore, it must bedealt with quickly.->Tectonic Shatter
is a skill that can be easily dodged by watching the animation10, 11, 12, 13.Easy section. Adjust the pulls according to your preference, and it's best to pull so that there aren't too many Alchemists in one group.
Test Subjects with low health but increasing attack power as the fight drags on,
Weapon Testers that use "
Echoing Blade
" dealing physical (sonic) damage to the target and enemies within 10 yards,Investment Development Company Alchemists that cast "Corrosive Mixture
" dealing nature damage and applying poison to the target, and "Transmute: Foe to Slime" inflicting a confusion status effect on the target,Investment Development Company Masterminds that cast "Mind Lash
" dealing magic (arcane) damage to the target, and "Brainstorm" creating a moving ground effect that deals arcane damage and silences when hit.->"Echoing Blade
" can be interrupted with CC, but is recast immediately after being dispelled.->Even if you are hit by "Transmute: Foe to Slime
", you can be freed by magic dispel.=>Transmute: Foe to Slime
highest priority interrupt,Mind Lashtarget use a defensive,Echoing Bladetarget move away from the group,Brainstormdon't step on it14.3rd boss is Rixza Fluxflame.
Uses "
Surging Catalyst
" creating ground effects that cover about 3/4 of the 2nd boss's roomUses "Azerite Catalyst
" guiding ground effects to the target for 3 secondsFires and pushes back the target with "Compressed Gas Burst
"Applies a nature damage DoT to 3 random targets with "Chemical Burn
".->UsesSurging Catalyst
at the start of the fight.The tank should move to the direction without the catalystand park->After that,Azerite Catalyst
is cast, and the target shouldtry to place it close to the existing ground.->The target ofCompressed Gas Burst
shouldstand in the direction of the catalyst groundandresist the pushing forceto clear the ground. It is cast a total of 3 times, switching targets, so the targets should clear the ground as much as possible, and those who are not the target should stand on the opposite side of the target, and the tank should move the boss towards the ground a little bit between casts. Repeating this pattern is all there is to it.->
Chemical Burncan bemagic dispelled.Last Boss Trash ~ Last Boss
This section gives quite a bit of percentage.
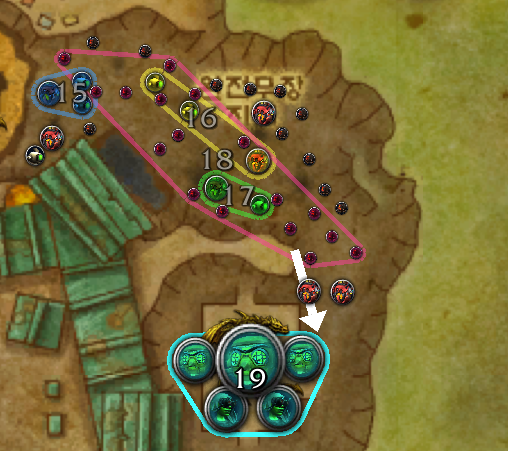
For reference, the instance resurrection location after defeating the 3rd boss is the 3rd boss's room.
15, 16, 17, 18
Spider Mines that pop up when you get close and chase a random target within range,
Siege Experts that fire a barrage that creates a large ground effect at the target's location, inflicting magic (fire) damage and a DoT upon impact with "
Shell Barrage",Investment Development Company War Machine groups that deploy Spider Mines with "
Spider Mine Deployment", and cast "Charged Shot" dealing magic (arcane) damage to the entire party.->If you get hit by a Spider Mine, you can consider yourself dead. Just avoid the bombs that are fixated on you. It's safe to touch the bombs that are fixated on other allies
->Spider Mines spawned by "
Spider Mine Deployment" donot give percentage=>Guide the Spider Mines to gather as much as possible, use AoE CC, and deal with them quickly. Be careful of adding while avoiding the Shell Barrage ground effects
-In the case of the last boss's front area, I can skip it with Shadowmeld as a Vengeance DH. If you don't skip it, you can adjust the percentage assuming you kill those two.
20.
Last boss is Mogul Razdunk.
Uses "
Gatling Gun" dealing physical damage in a rotating frontal coneUses "
Homing Missile" chasing the target, dealing fire damage upon impact, and exploding in a large areaUses "
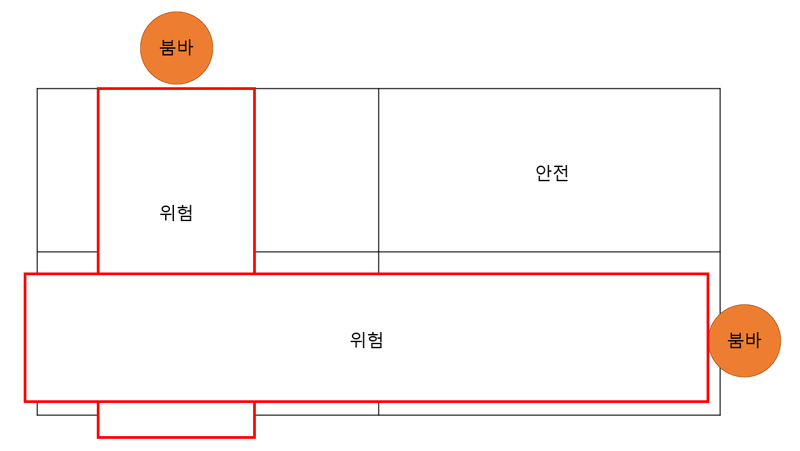
Boomba Summon" summoning adds that create a wide area of ground effects->When Boomba Summon is used, two Boombas that fly around the battlefield are summoned. They keep changing positions, and when dividing the battlefield into 4 quadrants,
ground effects are not created in the areas where the Boomba's fronts do not overlap. Also,the bombardment falls very quickly near the Boombas, so if it is impossible to move to a safe zone, you must move as far away from the Boombas as possible.I have prepared a simple diagram to help you understand.
->At this time, the Boomba's movement and the Gatling Gun come at a similar timing,
so be careful not to move the raid too quickly->
Homing Missiletargets shouldmove out alone so that the raid is outside the explosion range.When the boss's health drops below 50%, he becomes immune and flies into the sky,
and theIntermission Phasebegins.
During the intermission phase, Investment Development Company Skyfire Launchers are summoned, continuously casting "Destructive Barrage" dealing fire damage to random targets.
Also, 3 pillars appear on the battlefield, and the boss moves to a random target and casts "Skycrusher Slam" slamming the ground.
->The raid mustquickly deal with the Skyfire Launchers.
->The target ofSkycrusher Slamhas an arrow displayed above their head.The target must move to a pillar on the battlefield and guide the Skycrusher Slam to hit the pillar.
->The intermission phase continuesuntil all 3 pillars are hit, so the raid must complete the pattern as quickly as possible without making mistakes.
Thank you. Please leave any incorrect information in the comments
World of Warcraft Inven Mythic+ KeystoneIllago
2025-03-20