Post
SS+ Rank Just by Following This? Uma Musume New Track Universal Guide
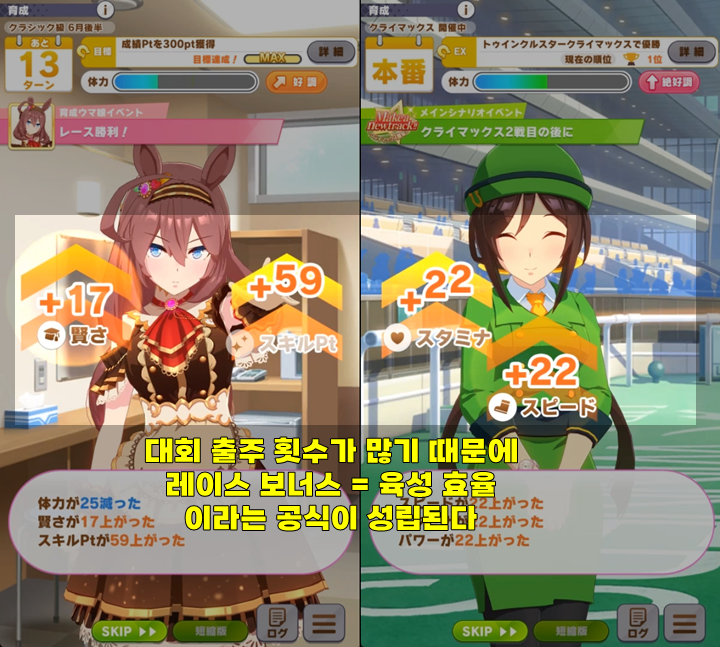
The new scenario [Make a new track!! ~Climax Opening~] has been introduced with the update on Thursday, June 15th. The characteristic of this scenario is that the proportion of race participation has greatly increased compared to the past.
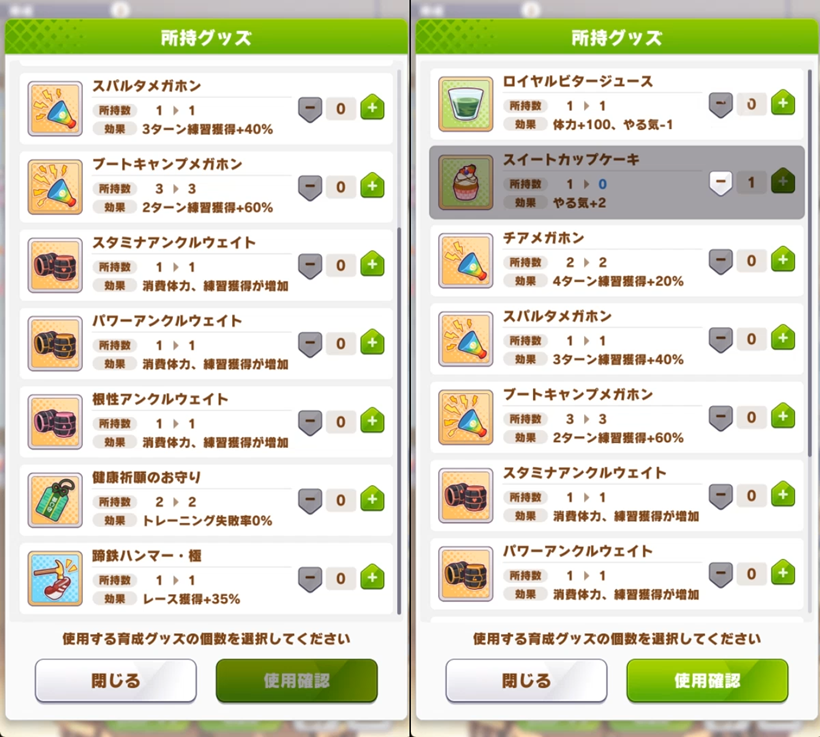
During the Climax scenario, a shop appears that sells special items that can only be used for that training. Depending on the use of items such as drinks that restore the stamina gauge, megaphones that increase friendship training efficiency, and carrot BBQ sets that increase bond gauge, you can achieve the same efficiency as doing 2-3 training sessions.
However, in order to purchase these items, you must go to the race and earn S coins. In other words,[Go to the race and collect coins] ▶ [Buy items to increase training efficiency with coins] ▶ [Use items to perform high-efficiency training]is the basic training method.
It can be said that it is completely the opposite of the method of selecting and participating in only important competitions such as URA or Aoharu, or minimizing participation in competitions and accumulating stats.
Thanks to this, users who have returned through the 1st anniversary, or users who have no experience with the Japanese server, may be embarrassed by the training method that has changed so much. The reporter also wants to share the basic training method for Climax and the general-purpose schedule table that can be easily followed because it was the most difficult to adapt to among the scenarios I have played so far.
Just follow the guide belowYou can easily secure SS grade or higher even if you follow it blindlyYou can. If you get used to the scenario to some extent while following it, you can change the deck or adjust the competition schedule according to your personal preference.
As explained earlier, the top priority in this scenario is race participation. You have to go to as many races as possible to earn skill Pt and use it to purchase items to increase training efficiency. However, some Uma Musume will be judged as unusable in this scenario.
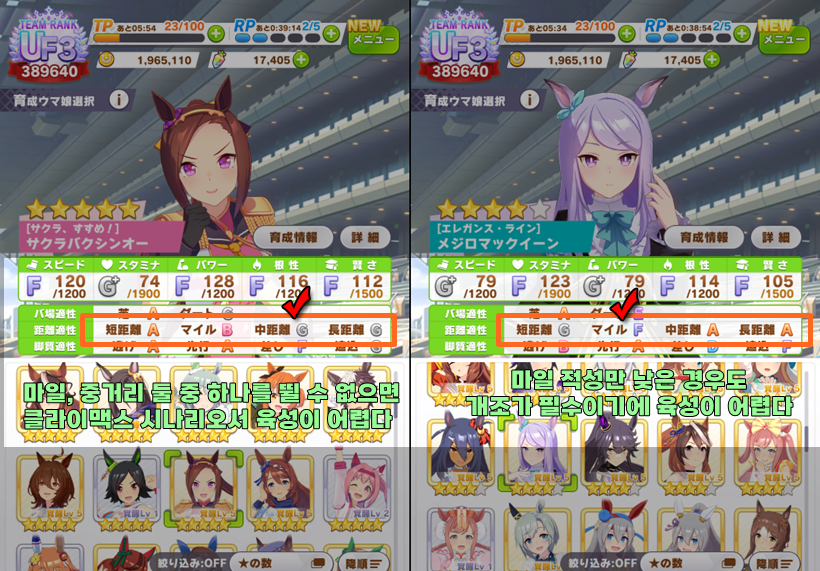
For example, there are Karen-chan, Sakura Bakushin O, or Haru Urara. The Uma Musume only have short-distance aptitude, and the remaining aptitudes are only possible up to a mile. In this caseBecause you can't participate in the mile/middle-distance competitions that account for 70% of the competitionProper training is not possible.
The Uma Musume used in the Climax scenario must have at least one of the mile/middle-distance aptitudes as A, and the minimum condition is that both can participate through modification. If you can't participate in mile or middle-distance competitions, there will be restrictions on rival matches, you won't be able to receive skill hints properly, and you will receive various penalties such as not accumulating the chairman's favorability, so finding an Uma Musume with the widest distance aptitude is the first condition.
The reason why Christmas Oguri Cap is a scam character is that it can participate in all distances from mile to long distance without any modification, and evenYou can freely go to dirt competitionsThis is because the range of choices during training is very wide.
On the other hand, it's a pity, but there are quite a few trainers who have been putting their favorite characters into the Champions Meeting until now, but in ClimaxIn many cases, if the distance aptitude is insufficient, it cannot be covered with affection.
1. You must be able to run a mile + middle distance through minimal modification
2. Even at worst, you should show a modification angle of about mile (middle distance) C or B
3. If a lot of factors are involved in the modification, or if there is no answer other than the inheritance event, it is virtually unusable
4. The best thing is to be able to handle miles and middle distances without modification (Oguri, Bourbon OP)

Basically, stamina and power factors are preferred in Climax. Instead, since guts training has become possible in practice, the value of stamina factors, which are relatively difficult to accumulate, has increased a little more.
And the value of the speed factor has also increased a little, but if you run mainly in competitions, the opportunity to press training will decrease, and if you are unlucky, the speed stat may not grow at all, so the number of users who choose the speed factor to give stability is also increasing.
Basically, it is recommended to choose stamina-oriented factors and adjust them according to the classification of the support card you set up or the training style. Of course, it is good to take URA or Aoharu scenario factors if you can.
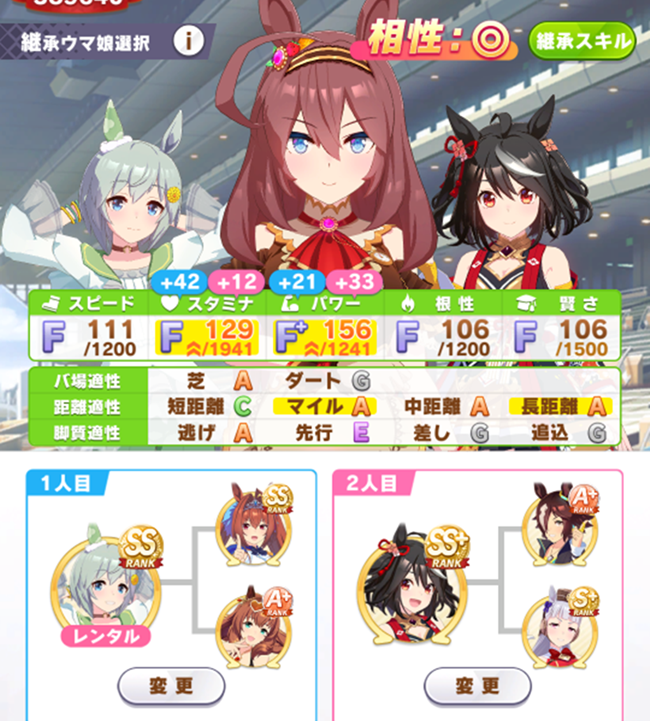
The Uma Musume I chose for the guide is Mihono Bourbon, who can cover miles to long distances without modification, but to ensure stability, I supplemented one mile and long distance factor each, and added factors to aim for middle distance S for the rest. For reference, I only used factors that were trained before Climax for both parents.
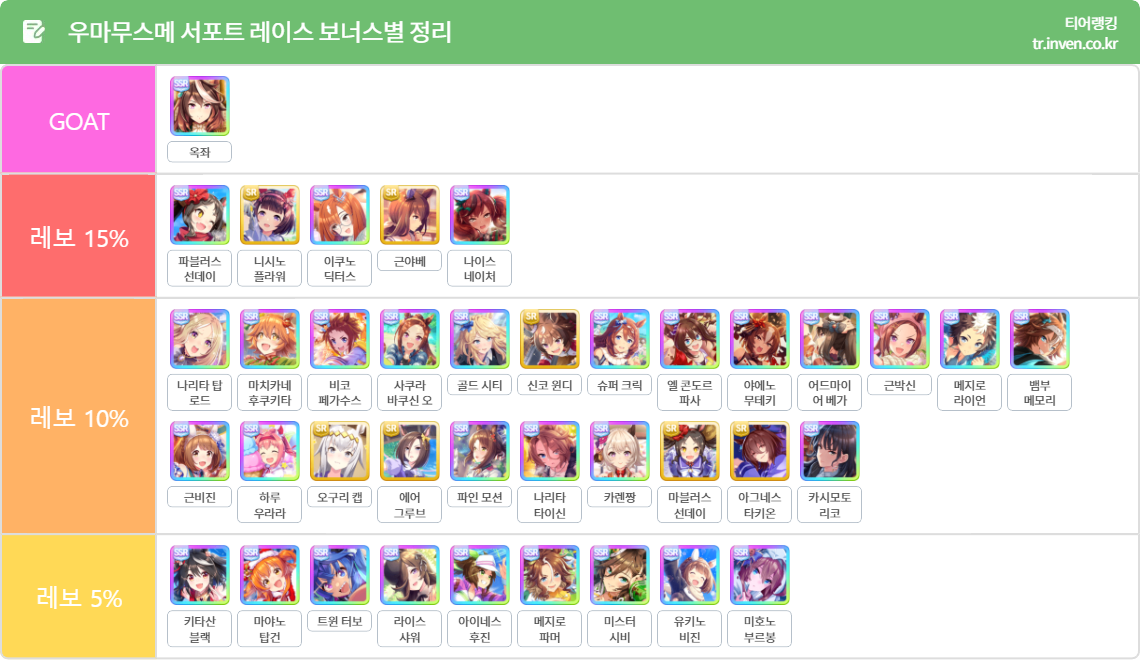
You have to approach the support card pool in a different way than you have been using it so far. Among the priorities in ClimaxThe first is race bonusSince you participate in at least 25 races and up to nearly 40 races, the higher the race bonus, the easier it is to achieve high scores.
The race bonus figure that is the standard for receiving additional stats is 60%The best thing is 70%, but in this case, you have to give up skills, so the basic thing is to set up 60% race bonus with 1-2 support cards that give major skills + the remaining 4 cards appropriately.
Even if the support card that gives the competition's essential skills has a low race bonus, or if there is a lack of ways to increase the race bonus among the supports you have,You must be careful to exceed at least 50%.With a race bonus below that, there is a high probability that training will be disrupted.
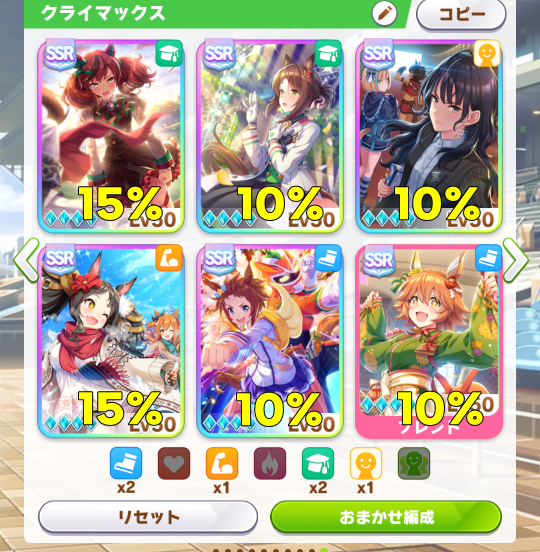
The deck I used this time is a deck with a total race bonus of 70%, and I selected it to show the importance of the race bonus in this scenario. It was selected as a build that can quickly grasp the essence of the Climax scenario, and even beginners can train high scores without much burden, but you will have to use a different build in future Champions Meetings or competitions.
Additionally, the guts training deck can be replaced with guts SR Admire Vega, distributed Yukino Bijin, distributed Haru Urara, etc. The attributes are mainly composed of speed and intelligence, but since there are not so many opportunities to press training, it is better to select supports with high race bonuses first.
1. The standard for obtaining additional stats with race bonus is 60%
2. The highest efficiency is 70%, and in the worst case, you must match 50%
3. Support cards that increase initial stats are also competitive (New Kukitaru, distributed Marvelous Sunday, etc.)
4. Finally, select mainly race bonus + essential skills + initial stat options
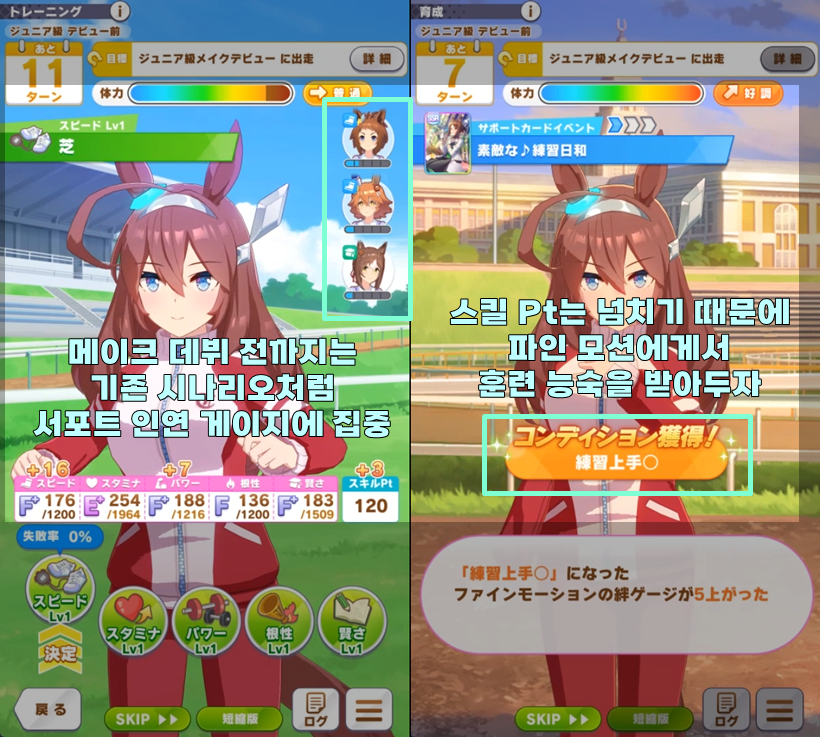
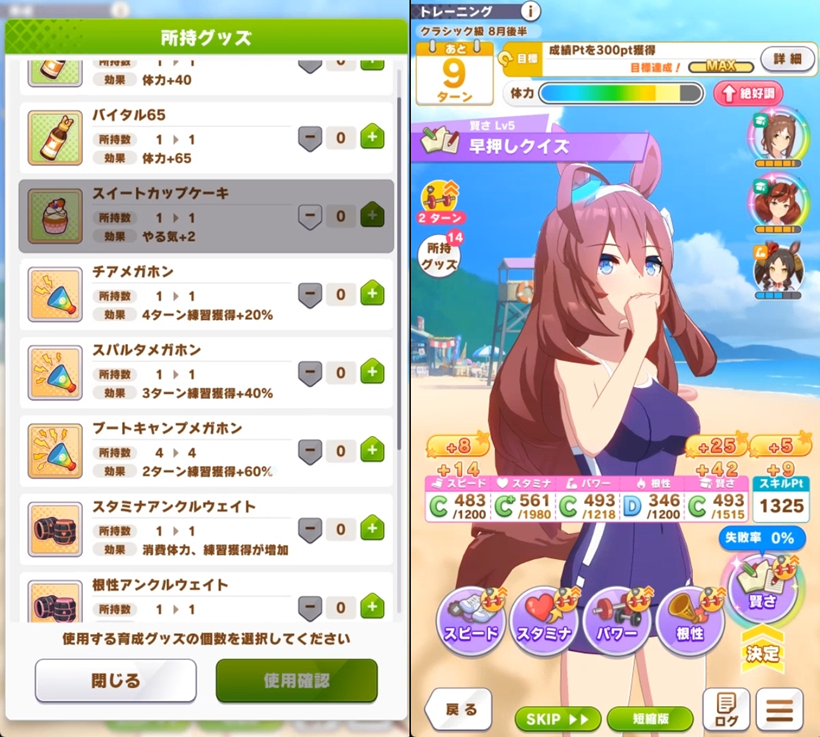
If training has started, the training process is the same as the existing training process until you play the Make Debut. Think of this as the only opportunity to build a bond gauge and press the training with as many support cards as possible.
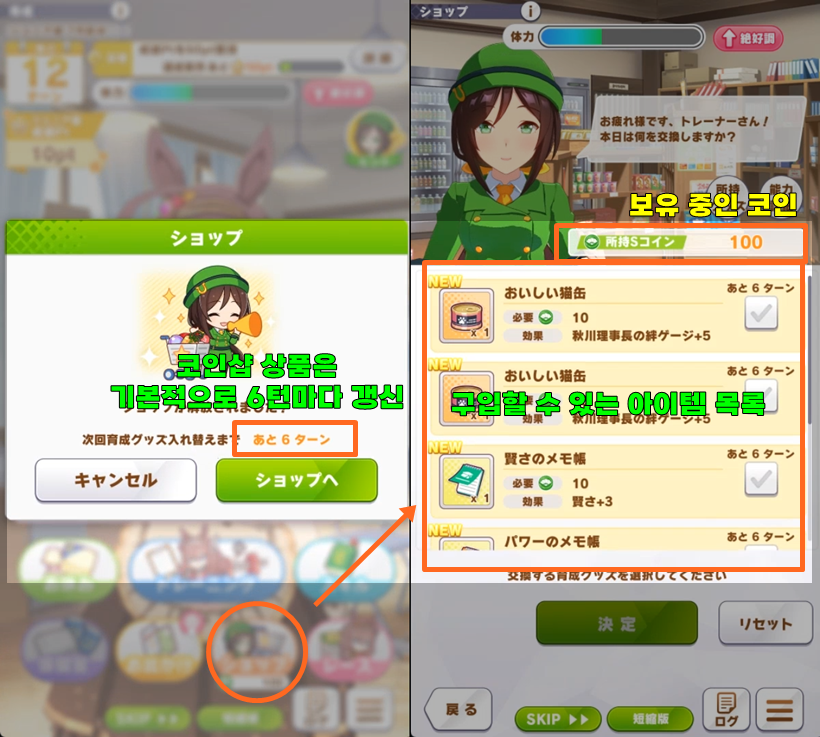
The period after Make Debut is the beginning of the full-fledged Climax. First, a coin shop opens, which contains various items that will help you train, which will be the core of this scenario. The list of items appearing in the shop is random, and is basically updated every 6 turns, but if you participate in rival matches, new products may be added.
EspeciallyRival MatchIn the case of , you will receive various benefits such as skill hints for the corners used in the race and acquisition of the chairman's bond gauge if you win, so if the training is not good, do not hesitate to proceed with the rival match.
For more information on item performanceClimax Store ListYou can check it in the article.

The items with high priority in the junior season areCarrot BBQIt is. You can automatically increase the bond gauge of support cards even if you don't train, so you can quickly run friendship training.
The second priority item is various condition or stamina, or horseshoe hammer items that increase the race bonus. You have to select this part at your discretion depending on the coins you have, but if you are not familiar with it, keep in mind that it is good to keep BBQ, stamina, and condition items for now. Buy the memo pad, tactics book, and vision book for the lacking stats first, and use them right away.
In fact, in the race-oriented build I used this time, you can buy everything you want because you have plenty of coins, and you can test various things. However, remember that the top priority item from junior to classic season is BBQ.
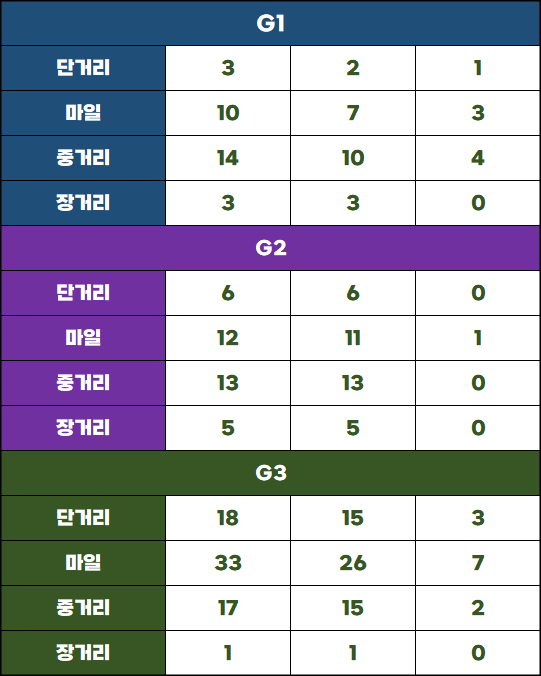
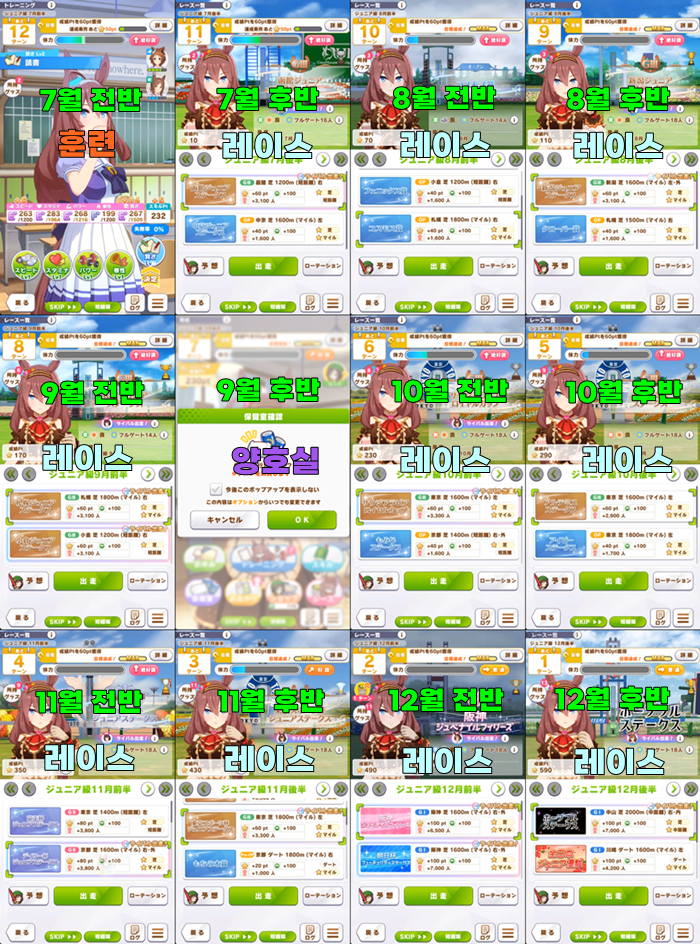
The schedule after Make Debut is to build up the support bond gauge again on days when there is no competition, and if there is a competition or a rival match is occurring, go out immediately. The approximate pattern is3 competition participation - 1 rest or training - 3 competition participation againis repeated.
There is no difference in rewards between G3 and G2, so choose a race where you can have a rival match or acquire a title bonus. If you are a beginner, it is difficult to pay attention to the title, so just think that you will press it if the rival match is lit.
The turn to train or rest for 1 turn in the middle is usually the turn when there is an OP competition. At this time, if you have a stamina item, recover your stamina and press training, and if your condition is too bad, use Lee Dae-ri to go out or treat yourself through the infirmary. In my case, I went out a little recklessly for 4 consecutive or 6 consecutive competitions because I could see the angle, but basically, it is better to keep the cycle of 3 competition participation - rest.
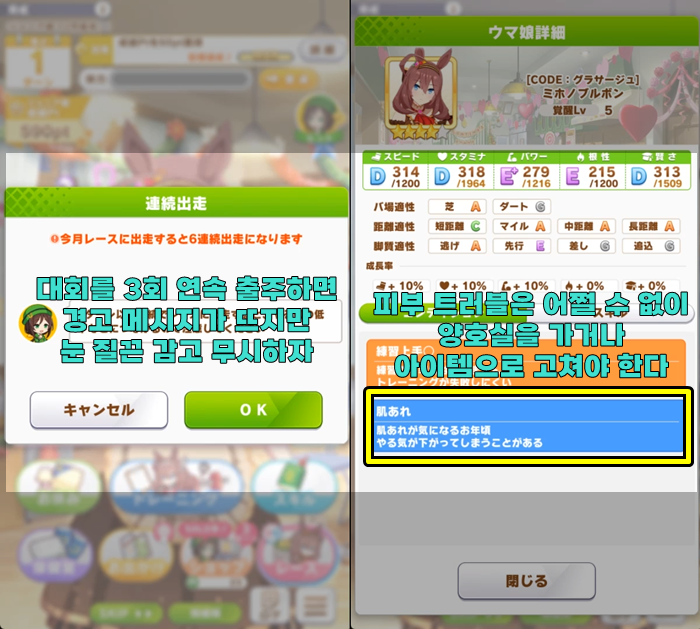
The important point here isEven if you participate in the last competition in late December every year, no penalty events (condition, stats, etc.) occur, so it is necessary to run 4 consecutive or 5 consecutive participations at the end of the yearIt will be.
You may ask if you are overworking Uma Musume too much, but in this scenarioOnly trainers who have abandoned human emotions can survive.
1. Buy & use BBQ first in the shop
2. It is divided into 2 builds: building a bond gauge in the junior season or running a race from the beginning
3. The race-oriented build rotates the cycle of 3 consecutive participations - rest
4. No penalty events occur even if you participate in the race in late December
5. If the support is spread out while building the bond gauge, prioritize the bond gauge of the intelligence card
In the classic season, you can proceed while keeping the basic race 3 consecutive participation - rest cycle. Coins will be overflowing, but in the race-oriented build, take stat-oriented items such as memo pads, tactics books, and vision books, and buy boot camp megaphones or ankles with the remaining coins.
Since it is a concept of minimizing training and turning races to collect coins and going to races to accumulate stats, you can take a different approach if you get used to it.
Keep 3 boot camp megaphones (for summer camp), 3-4 main stat ankles (keep 2 main stat ankles each), stamina recovery & amulet items as much as possible, 2-3 condition recovery items, and 2-3 skin trouble and bad condition remedies.
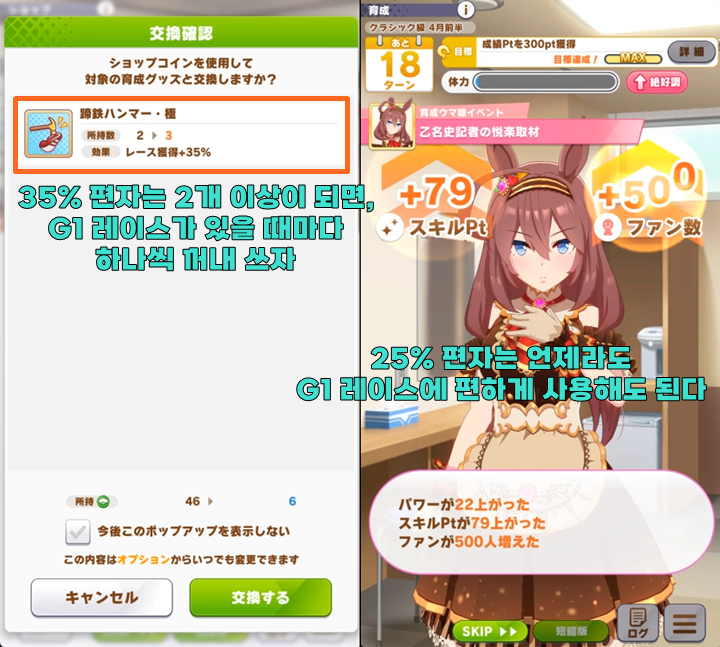
In the case of horseshoe hammers that add race bonusIt is recommended to buy them as you see them and use them for every G1 raceIt will be. Of course, the priority is pushed back, so you have to buy other necessary items first and then buy them with the remaining coins.
You may be worried about summer camp, but it is ideal to intensively use ankles and boot camp megaphones, which are items that increase training efficiency, in summer camp, but you don't have to pay much attention to it because the supports may go on strike. In other words, even if it is not summer camp, if you think that this training (2-3 rainbows or more) should be pressed, it is better to turn training than race.
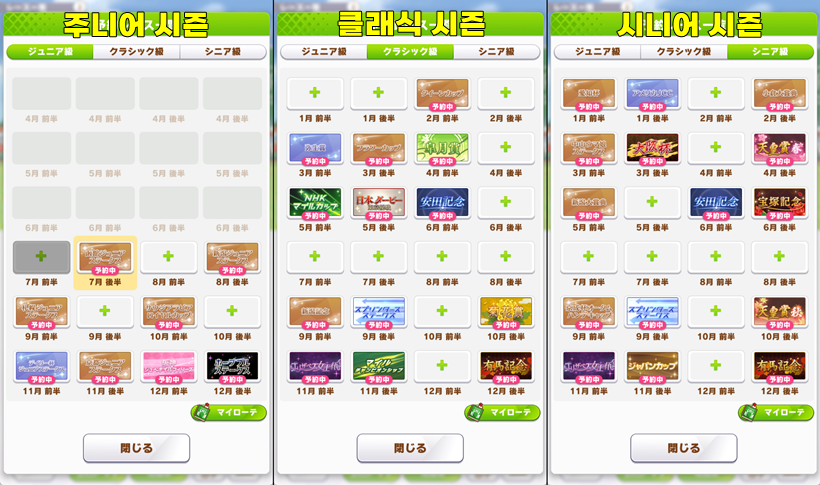
The difference from the junior is that G1 races appear a lot in earnest, especially in this scenarioClassic Triple CrownIf you get the title, you will get an additional stat bonus, so you need to adjust the schedule according to the race schedule.
For example, it is important to adjust the schedule so that you can participate in major G1 competitions such as Satsuki Sho - (rest or training) - NHK Mile Cup - Japanese Derby - Yasuda Kinen - Takarazuka Kinen.
If 4 consecutive turns seem a bit too much, you can go into rest or condition adjustment in preparation for summer camp because Takarazuka Kinen is also possible in the senior season.
The schedule after the camp should also be fixed in the order of Kikuka Sho - Elizabeth Queen's Cup - Mile Championship - Rest (or Race) - Arima Kinen from October. The Autumn Triple Crown, which starts from Tenno Sho (Autumn), can be completed in the senior season to receive stat rewards, and here, the goal is to complete the mile G1 to receive related rewards such as Rapid Miler / High-Speed Miler.
Since there are no penalties even if you participate in the last Arima Kinen in a row, you can try 5 consecutive participations from Kikuka Sho if you want to aim for a higher score.
1. You need to adjust the number of items you have
2. Have 2-3 megaphones (40% or more) and 4-5 ankles (mainly main stats) before summer camp
3. It is recommended to challenge the Classic Triple Crown title
4. You can give up training and participate in the race even during summer camp
5. If a 3-rainbow level training appears on a turn other than summer camp, choose training instead of race
The points of the senior season are the Spring Triple Crown (Osaka Hai, Tenno Sho (Spring), Takarazuka Kinen) and the Autumn Triple Crown (Tenno Sho (Autumn), Japan Cup, Arima Kinen). You must participate in the competition.
If you missed the Yasuda Kinen in the classic season for miles, it is good to participate, and if you are an Uma Musume with short-distance aptitude, you must take the Sprinters Stakes to receive the high-speed sprint bonus. Other than that, you can keep the 2-3 competition participation - rest or training cycle that you have been doing since the junior season.
However, the standard for competition participation is only when there is nothing special, and if stats can increase by 80-100 at once, such as 3-rainbow training or 2-rainbow +@, it is better to give up even the G1 competition and train. Other than that, it can be said to be a repetitive task of the classic season.
Below is the race schedule table that I mainly used on the Japanese server, and you can train with versatility by adjusting the number of participations by +- 5 times from this schedule.
However, in the case of the Champions Meeting, in order to match the stats that receive additional competition correction, you have to do a little more training related to the stats, so in this case, the number of participations is reduced to about 27-30 times.
However, no matter how bad the situation is, basically'Set up the 3 iron rules of participating in at least 25 competitions + participating in most G1 competitions + race bonus is based on 60%'I kept it throughout the scenario.
I participated in the competition a little more in this training
If you get used to the scenario, you can customize it to your liking by adjusting the timing of item use in more detail or running more races, but if you are a first-time user, please refer to the schedule table and deck settings above and follow it as it is.
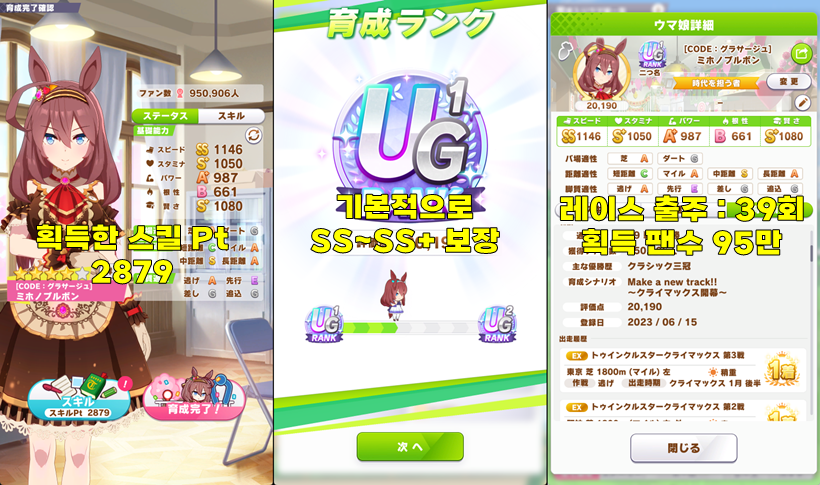
The final grade of Chocobong, who was trained for writing this article, achieved UG1. I used support cards and factors that could be used as of the Climax update as much as possible, but surprisingly high grades came out. Of course, the skill hint level up itself is done, and the influence of the evolution skill may be there (I habitually took it)The actual grade is estimated to be between SS+~UGIt will be.
The total number of race participations was 39, and the number of training sessions after Make Debut was about 10. I went out with Lee Dae-ri for the remaining rest turns.

You may wonder if it is right to participate in the race in 3 consecutive, 4 consecutive, or even 6 consecutive times while getting skin troubles like this when you train for the first time, but as you can see, you can easily achieve UG grade as well as most SS~SS+ grades just by following it.
After you get used to the training, you will be able to set the priority of items purchased from the shop and a more detailed schedule table, so until then, please refer to the table and try to follow it blindly to get a feel for it.
Webzine InvenReporter Lee Moon-gil
2023-06-15